What Is a Laundry-to-Landscape System?
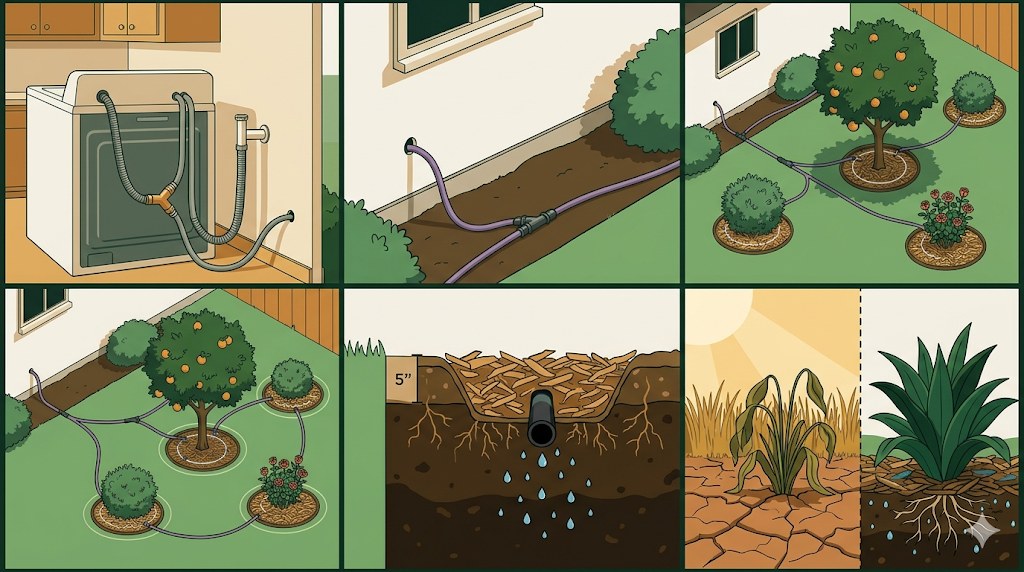
A laundry-to-landscape (L2L) system redirects your washing machine's drain water to the yard instead of sending it down the sewer. The "landscape" part means the water goes directly to mulch-covered basins around trees, shrubs, or ornamental plants — where it soaks into the soil and irrigates the root zone without surfacing.
L2L is the most widely permitted type of greywater system in the United States because it requires no modification to your home's plumbing. You access the water from the washing machine's external drain hose — the rubber hose you can see hanging out the back of the machine — before it reaches the standpipe. Everything is above-ground, fully removable, and costs under $200 for most installations.
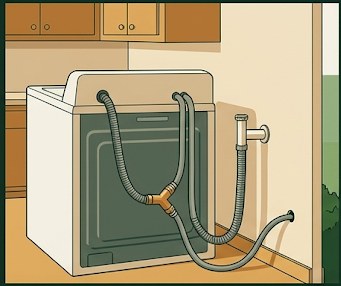
The system's core is a three-way diverter valve: a Y-shaped valve that connects your machine's drain hose on one side, your sewer (the standpipe) on one output, and your outdoor tubing on the other. When you want to greywater your landscape, you flip the valve toward the yard. When you want to greywater sensitive loads (dark clothes, diapers, bleach loads), you flip it toward the sewer. Most homeowners eventually develop a rhythm — greywater most loads, sewer for problem loads.
The critical legal distinction for L2L is that it accesses water from outside the home's plumbing system. Because you're not cutting into any pipes — you're simply rerouting a hose that was never connected to anything permanently — most states don't classify this as "plumbing work" requiring a permit. In California, Texas, Arizona, New Mexico, and many other states, this distinction is explicit in the code.
Before You Start: Three Things to Verify
1. Check Your State's Rules
L2L systems are legal without permits in many states but not all. Before purchasing materials, visit your state's guide on this site (browse all states) to confirm whether your state requires a permit and any specific requirements (setbacks, overflow connections, labeling) that apply to your installation.
2. Identify Your Irrigation Zones
Walk your yard and identify 3–8 plants or landscape areas that would benefit from regular supplemental irrigation. Good candidates: established fruit trees, large ornamental shrubs, rose bushes, native plants. Avoid: vegetable gardens, herb patches, areas where children play, areas within 5 feet of the house foundation, or areas that drain toward a neighbor's property or a storm drain.
Measure the approximate distance from your washing machine to each zone — you'll need this for tubing length. Most L2L systems work well up to 100 feet from the machine (the machine's pump has sufficient pressure for this distance).
3. Assess Soil Drainage
Before sizing your mulch basins, test your soil's absorption rate. Dig a hole 12 inches deep near your first planned basin location. Fill it with water and observe: if the water drains completely within 30 minutes, you have good drainage (sandy or loam soil). If it takes 1–3 hours, you have moderate drainage (clay loam). If it's still there after 3 hours, you have poor drainage (clay or caliche) and will need larger, shallower basins.
Use our sizing calculator after assessing your soil type to get exact basin dimensions.
Complete Materials List
| Item | Typical Cost | Where to Buy |
|---|---|---|
| 3-way diverter valve (¾" or 1") | $30–$60 | Oasis Design (online), some plumbing supply stores |
| 1" schedule 200 polyethylene (PE) tubing, 50–100 ft | $25–$50 | Irrigation supply stores, Home Depot, Lowe's |
| 1" barbed tee fittings (1 per zone) | $3–$5 each | Irrigation supply, online |
| 1" barbed end caps (1 per zone) | $2–$4 each | Irrigation supply, online |
| Hose clamps (assorted) | $8–$12 | Hardware store |
| Purple pipe tape / label | $4–$8 | Hardware store, irrigation supply |
| Wood chip mulch (1–2 yards) | Free–$60 | Arborist drop-offs (free), nurseries, city composting programs |
| Shovel and hand trowel (if you don't have them) | $20–$40 | Hardware store |
| Total | $80–$200 |
Arborists generate enormous amounts of wood chip mulch and often need to dump it cheaply. The website ChipDrop.com connects homeowners with local arborists who will dump a load of fresh chips at your address for free or a small tip. A single load is usually 5–12 yards — more than enough for most L2L systems, with plenty left for other garden uses.
3-Way Brass Hose Splitter — Zone Distribution Fitting
Every L2L system with more than one irrigation zone needs a splitter at each branch point in the yard. This heavy-duty brass ¾" GHT T-splitter handles the water pressure of washing machine drain output, resists rust and freeze damage, and splits one tubing run into multiple zones without reducing flow. You'll need one per branch point — most 3–4 zone systems use 2–3 of these.
🛒 View on Amazon →As an Amazon Associate, GreywaterHub earns from qualifying purchases. This does not affect our editorial recommendations.
Step-by-Step Installation
Step 1: Plan the Route (30 min)
On paper or in your head, map the route from your washing machine's location to each irrigation zone. Decide whether the tubing will exit through a wall (requires drilling a 1.5" hole through the exterior), under a door threshold (no drilling), or through a vent opening. For machines in garages, the exit is usually through the garage wall or under the garage door.
The tubing needs a gradual downhill slope or at least level grade to the yard — the machine's internal pump pushes water through the hose with enough pressure to handle minor uphill sections (up to 3–4 feet of rise), but gravity flow is more reliable for long runs.
Step 2: Disconnect and Reconnect the Drain Hose (20 min)
Pull the washing machine about 18 inches away from the wall to access the back. You'll see the drain hose — a corrugated rubber or plastic hose typically routed over the edge of the laundry tub or into a standpipe (a vertical pipe in the wall). Disconnect this hose from where it drains. Connect it to the inlet of your three-way diverter valve using a hose clamp.
Connect one outlet of the diverter valve back to the standpipe or laundry tub — this is your sewer overflow path. Connect the other outlet to your new 1-inch polyethylene tubing heading outside. Secure all connections with hose clamps and verify they're tight.
Step 3: Route Tubing Outside (30–60 min)
Run the tubing from the diverter valve through your chosen wall exit to the first irrigation zone. Use purple pipe tape to label the tubing "NON-POTABLE / GREYWATER" every 10–15 feet along its length — this is required by most state rules and is a good safety practice if anyone excavates near the tubing in the future.
At the first zone, install a barbed tee fitting (which creates a split — one line continues to the next zone, one line drops into the basin). At the last zone, install an end cap. This creates a branching network where water fills all zones simultaneously.
Step 4: Dig Mulch Basins (60–90 min)
At each irrigation zone, excavate a basin sized to your soil type and daily volume (use the calculator for exact dimensions). The basin should be:
- Located in the active root zone of the plant (typically at the drip line, not against the trunk)
- Deep enough to fully receive the water outlet buried in mulch — minimum 8 inches deep for clay soils, 12 inches for sandy soils
- Wide enough for the expected daily volume to absorb before the next laundry day (see soil type chart)
Save the excavated soil for other uses — mixed with compost, it can improve other areas of the garden.
Step 5: Place Outlets and Add Mulch (30 min)
Route the tubing to each basin and cut a small outlet hole at the end of each tee fitting's branch. The outlet should terminate inside the basin, pointing downward or horizontally. Do not leave bare tubing ends pointing up — water needs to flow into the mulch, not spray upward.
Fill each basin with wood chip mulch to within 1–2 inches of grade. The mulch depth over the outlet should be at least 3–4 inches. This mulch layer does three things: prevents odor, prevents mosquito breeding, and ensures the greywater is absorbed by the soil-mulch interface rather than the open air.
Step 6: Label Everything and Test (30 min)
Label the diverter valve clearly: "GREYWATER — YARD" and "SEWER" with arrows pointing in the right directions. Verify the valve positions are correct by running water from a bucket through the machine inlet and watching which outlet it exits.
Run a full laundry load and watch all basins. Signs of a successful installation:
- Water appears at each basin within 2–3 minutes of the wash cycle ending
- Water absorbs into the mulch within 5–15 minutes (faster in sandy soils)
- No water appears on the surface more than 30 minutes after the cycle
- No water reaches the property line or pavement
If water pools persistently, the basins may be undersized for your soil type — add more surface area by widening the basins, or create additional zones.
Ongoing Maintenance
- Monthly: Check mulch basins for pooling or ponding after laundry days — add mulch if basins are absorbing slowly.
- Monthly: Inspect diverter valve for leaks or loose hose clamps.
- Seasonally: Redirect to sewer during dormant or wet seasons when landscape doesn't need irrigation.
- Annually: Replenish mulch in basins — wood chips decompose over time and basins need topping off every 12–18 months.
- Annually: Check purple labeling along tubing for fading — re-mark if needed.
- Always: Direct to sewer when washing diapers, heavily soiled items, or loads treated with bleach or chlorine.
Troubleshooting Common Problems
Problem: Water Pools in the Basin and Doesn't Absorb
This almost always means the basin is undersized for your soil type. Expand existing basins or add new zones to distribute the volume. If you're in a clay soil area, also try aerating the basin bottom with a garden fork before adding mulch — breaking up compaction helps initial drainage.
Problem: Water Only Reaches the Closest Zone
The tubing run may have developed a low point where water pools before reaching further zones. Check the grade of the tubing — all runs should slope slightly downward or maintain level grade. A "belly" in the tubing traps water. Also verify your tee fittings are installed correctly (open-end pointing toward the next zone, branch pointing into the basin).
Problem: Slight Odor Near Basins
Usually caused by insufficient mulch depth — increase to 4–5 inches over outlet points. Also check whether high-sodium detergent is contributing to anaerobic conditions in the soil. Switch to a greywater-safe low-sodium detergent (see soap guide). Odor should resolve within 2–3 weeks of adding mulch.
Problem: Machine Drains Slowly or Backs Up
This can happen if a tee fitting is partially blocked or if the tubing has a clog. Check all fittings and flush the lines by redirecting to sewer during a cycle and running clear water through the system. Also check that your diverter valve is fully open in whichever direction you've selected — a halfway-open valve creates backpressure.
Frequently Asked Questions — L2L Systems
-
Yes — front-loaders work well with L2L systems. The difference is that front-loaders typically have a pump that creates lower but more consistent water pressure than top-loaders. This means front-loaders can typically handle 6–8 irrigation zones effectively (vs. up to 20 for top-loaders). The drain hose on most front-loaders exits from the back lower panel and connects to a standpipe or utility sink drain — the diverter valve connects there.
-
Flip the diverter valve to the sewer position before running the load. This is completely normal — L2L systems are designed to switch between greywater and sewer as needed. Some homeowners add a simple outdoor soil moisture sensor near their main basin zone so they know whether the ground is already saturated before running a laundry cycle. These sensors cost $15–$30 and give you a real-time read on when irrigation is actually needed.
-
If your washing machine doesn't run during a power outage, the system isn't active either — no problem there. If you have a generator and run laundry during an outage, the system works exactly as normal. The diverter valve is mechanical (no electronics), and the tubing system is gravity/pump-fed without any electrical components.
-
Well-designed L2L basins receive rain like any other mulched planting area — the mulch absorbs rainfall, and healthy soil beneath handles the percolation. You should not see greywater-specific problems from rain unless your basins are in a low spot that collects rainwater runoff from elsewhere on the property. If rainwater already pools in your planned basin area during storms, that's not a good location for L2L — choose higher ground instead.