What Is a 3-Way Zone Splitter — ¾" GHT Brass (Companion to Diverter Valve)ter Valve?
A diverter valve is the single most important component in a laundry-to-landscape system. It connects to your washing machine's drain hose and lets you switch between two discharge paths: the sewer (your standpipe or laundry tub) and your landscape irrigation tubing. Without it, you'd need to physically move the drain hose between two locations — which is impractical and doesn't meet code in any state.
In a properly installed L2L system, the diverter valve sits near the washing machine, clearly labeled, easily accessible, and with both outlet paths physically connected at all times. This means you can switch from greywater to sewer mid-season (for rainy weather, dormant periods, or problem loads) simply by turning a handle.
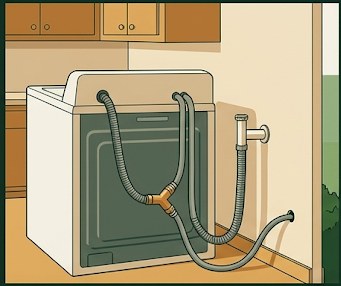
Types of Diverter Valves
3-Way Manual Ball Valve (Most Common)
A three-port ball valve with one inlet (from the washing machine hose) and two outlets (to sewer, to landscape). A single handle rotates between the two positions. This is the most reliable, lowest-cost, and most widely used option for residential L2L systems. Most are made from HDPE, PVC, or reinforced nylon and are rated for the pressure and temperature range of washing machine drain water.
Brands to look for: Oasis Design makes the most commonly cited greywater-specific 3-way valve. Generic irrigation ball valves in ¾" and 1" sizes from hardware stores also work if they're rated for drain water temperatures (up to 140°F for hot wash cycles).
2-Way Diverter (Simpler, Less Flexible)
Some homeowners use a simple 2-way Y-diverter — the water goes either left (sewer) or right (landscape) but there's no center/closed position. These work but offer less precise control. They're adequate for many residential situations.
Automatic Diverter Valves (Motorized)
Motorized diverter valves respond to electrical signals — you can automate them with a timer, a soil moisture sensor, or a smart home hub. When the soil sensor says "dry," the valve routes to landscape; when it says "wet," it routes to sewer. These are significantly more expensive ($80–$200 vs. $30–$60 for manual) but eliminate the habit-forming requirement of switching the valve manually.
Automatic valves are overkill for most residential L2L systems but make sense for: households where multiple people do laundry (hard to enforce habits), systems in climates with unpredictable rainfall, or homeowners who travel frequently.
Choosing the Right Size
Diverter valves for residential L2L systems come primarily in ¾" and 1" sizes, matching the diameter of the washing machine drain hose:
| Machine Type | Typical Drain Hose Size | Valve Size |
|---|---|---|
| Top-loading standard | 1" OD corrugated | 1" valve |
| Top-loading HE | ¾"–1" OD | ¾" or 1" valve |
| Front-loading | ¾" OD rigid outlet | ¾" valve |
| Compact/combo | ¾" or ½" OD | ¾" valve with reducer |
When in doubt, measure your existing drain hose outer diameter before ordering. A ¾" valve on a 1" hose requires an adapter; a 1" valve on a ¾" hose also requires an adapter. Both are available at plumbing supply stores for a few dollars.
Installation Steps
- Pull the machine away from the wall — you need about 18 inches of clearance to access the back and comfortably work with the drain hose.
- Locate the drain hose — a corrugated rubber or plastic hose coming from the back of the machine, typically routed into a standpipe (vertical pipe in the wall) or hooked over the edge of a laundry tub. Note where it terminates.
- Disconnect the hose from its current terminus — the hose clips or hooks into the standpipe. Pull it out. You may need to release a clip or zip tie holding it in place.
- Connect the hose to the diverter valve INLET — use the appropriate barbed fitting or compression connection. Secure with a stainless steel hose clamp. Do not overtighten — you can crack plastic fittings. Finger tight plus one quarter-turn with pliers.
- Connect OUTLET 1 back to the standpipe — run a short section of drain hose or tubing from one valve outlet back to the standpipe. This is your sewer overflow path. It must always be connected.
- Connect OUTLET 2 to your landscape tubing — run 1" polyethylene tubing from the other valve outlet through your wall exit point and out to the irrigation zones.
- Label the valve — use purple pipe tape or a permanent weather-resistant label. Mark both positions clearly: "SEWER" and "GREYWATER / LANDSCAPE." This is required by code in most states.
- Test before pushing the machine back — run a small load with the valve set to sewer and verify no leaks at any connection. Then switch to landscape and run another small load, watching for water at the first basin within 2–3 minutes.
Where to Buy
3-Way Zone Splitter — ¾" GHT Brass (Companion to Diverter Valve)ter Valve — ¾" or 1" Three-Way Ball Valve
Once your diverter valve routes water outside, you need zone splitters to branch the single tubing run to multiple mulch basins. This heavy-duty brass 3-way ¾" GHT splitter handles washing machine drain water temperatures (up to 140°F), is freeze-resistant for cold-climate states, and creates full-flow splits without pressure loss. You'll typically need 1–3 of these depending on your number of zones — one at each branch point in the yard.
🛒 View Zone Splitter on Amazon →As an Amazon Associate, GreywaterHub earns from qualifying purchases.
| Source | What They Carry | Price Range |
|---|---|---|
| Oasis Design (oasisdesign.net) | Greywater-specific 3-way valves, kits, accessories | $45–$75 |
| Amazon | Generic ball valves, Y-diverters (verify temp rating) | $15–$45 |
| Local irrigation supply store | Ball valves, poly tubing, barbed fittings | $20–$50 |
| Home Depot / Lowe's | PVC ball valves, hose fittings (limited greywater-specific) | $12–$35 |
| Greywater Action (greywateraction.org) | Educational resources, links to vetted suppliers | Varies |
Troubleshooting Valve Problems
Valve Leaks at Connections
Check hose clamps — they should be snug but not crushing the tubing. Verify the barbed fitting is fully seated inside the hose before clamping. If a plastic fitting cracked from overtightening, replace it (they're inexpensive).
Machine Drains Slowly
The valve may be partially open in both positions, creating flow restriction. Verify the handle is clicking fully into each position. Also check that the standpipe overflow tubing isn't kinked or too long — resistance in the overflow path creates backpressure.
Valve Won't Switch Smoothly
Mineral buildup from hard water can stiffen ball valves over time. Apply a small amount of plumber's silicone grease to the ball through the ports. If the valve is seized, replace it — a new ball valve costs $30–$60 and takes 20 minutes to swap.
Water Goes to Both Paths Simultaneously
The ball inside the valve is worn or the handle is not moving the ball to the correct position. Replace the valve.